

🎈前言
工具函数库为开发人员提供高效、便捷的工具函数,简化开发流程,减少模板代码,提高代码质量和可维护性。在团队协作或长期维护的项目中,工具函数库是提升开发效率的关键环节。
本文将手把手教你如何从零搭建一个强类型、易维护的前端工具函数库。这篇博客以我的开源项目 Parsnip-Kit 为例,解析搭建前端工具函数库的技术。
Parsnip-Kit 这个库主要是把开发中遇到的较常用的函数进行一个整合,形成的一个工具库。它是一个零依赖、多功能、模块化的 JavaScript 工具库,支持 TypeScript。
Github:https://github.com/shika-space/parsnip-kit
文档站点:https://shika-space.github.io/parsnip-kit/
🎇项目架构全景
问了一下 AI,一个优秀的工具函数库应该具备:
- 模块化设计:按功能领域划分模块
- 类型友好:完善的 TypeScript 类型声明
- 高质量保障:单元测试覆盖率 > 95%
- 开箱即用:支持多种模块化方案(ESM/CJS/UMD)
- 开发友好:完整的文档和示例代码
Parsnip-Kit 也符合这些要求,Parsnip-Kit 项目基于现代构建工具 Vite 构建,结合了 Vitest 单元测试和 ESLint + Prettier 代码规范,保证项目迭代更新中保持代码质量。
除此之外,我使用了 VitePress 搭建文档站点,基于 inquirer 搭建了新建模块脚手架,基于 comment-parser 搭建的文档生成工具,减少了迭代更新中的重复操作。
---
title:
config:
  theme: default
---
graph TB
O[项目架构]---A[类型安全]---TypeScript
O---C[构建方案]---Vite
C---dts-bundle-generator
O---D[单元测试]---Vitest
O---E[代码规范]---Eslint
E---Prettier
O---F[Git 工作流]---Husky
F---Lint-Staged
O---G[脚手架]---Inquirer
O---H[文档生成]---Comment-Parser
O---I[文档站点]---VitePress

linkStyle 0 stroke:#9370DB,stroke-width:2px
linkStyle 1 stroke:#9370DB,stroke-width:2px
linkStyle 2 stroke:#9370DB,stroke-width:2px
linkStyle 3 stroke:#9370DB,stroke-width:2px
linkStyle 4 stroke:#9370DB,stroke-width:2px
linkStyle 5 stroke:#9370DB,stroke-width:2px
linkStyle 6 stroke:#9370DB,stroke-width:2px
linkStyle 7 stroke:#9370DB,stroke-width:2px
linkStyle 8 stroke:#9370DB,stroke-width:2px
linkStyle 9 stroke:#9370DB,stroke-width:2px
linkStyle 10 stroke:#9370DB,stroke-width:2px
linkStyle 11 stroke:#9370DB,stroke-width:2px
linkStyle 12 stroke:#9370DB,stroke-width:2px
linkStyle 13 stroke:#9370DB,stroke-width:2px
linkStyle 14 stroke:#9370DB,stroke-width:2px
linkStyle 15 stroke:#9370DB,stroke-width:2px
linkStyle 16 stroke:#9370DB,stroke-width:2px
linkStyle 17 stroke:#9370DB,stroke-width:2px
linkStyle 18 stroke:#9370DB,stroke-width:2px
🧨类型安全:TypeScript
TypeScript 作为 JavaScript 的超集,为开发带来了诸多优势。它通过添加静态类型系统,在编译阶段就能对代码进行类型检查,有效预防错误,减少运行时出现的bug。TS 提供的类型约束、类型推导,也为使用者提供了清晰的指引。
✨构建方案:Vite
Vite 是一个现代的前端构建工具,对 TypeScript 有很好的支持,提供了极快的开发体验。
作为一个工具库,我们需要的是库模式打包,Parsnip-Kit 的项目打包配置如下,它支持了 ESModule、CommonJs、UMD 3 种模块规范,使得库可以用在不同模块规范的场景中:
ts- import { dirname, resolve } from 'node:path'
- import { fileURLToPath } from 'node:url'
- const __dirname = dirname(fileURLToPath(import.meta.url))
- export default defineConfig({
- // ...
- build: {
- lib: {
- entry: resolve(__dirname, 'packages/main.ts'),
- name: 'parsnip-kit',
- fileName: 'parsnip-kit',
- formats: ['es', 'umd', 'cjs']
- },
- },
- })
生成 dts 文件一般是用 vite-plugin-dts,在 Vite 5 上,这个插件跑不起来了,这里改成用 dts-bundle-generator。
sh- npm i dts-bundle-generator -D
在根目录新建 dts-bundle-generator.config.json
json- {
- "compilationOptions": {
- "preferredConfigPath": "./tsconfig.json"
- },
- "entries": [
- {
- "filePath": "./packages/main.ts",
- "outFile": "./dist/parsnip-kit.d.ts"
- }
- ]
- }
构建的命令这么写就好了:
json- {
- "scripts": {
- "build": "vite build && npx dts-bundle-generator -config dts-bundle-generator.config.json"
- }
- }
🎉单元测试:Vitest
Vitest 是一个轻量级的测试框架,它与 Vite 无缝集成,能够快速运行测试用例。重要的是 Vitest API 设计与 Jest 保持一致,整合了 v8、Istanbul 等测试覆盖率统计工具,拥有多种报告输出器,使得我们可以一站式地完成单元测试配置。
下面是 Parsnip-Kit 的项目的 Vitest 配置,它使用了默认的 v8 统计测试覆盖率,并且使用了 JSON 报告器输出,以便后续在文档中展示测试覆盖率:
ts- import { defineConfig } from 'vitest/config'
- export default defineConfig({
- test: {
- reporters: ['json', 'default'],
- outputFile: 'coverage/coverage.json',
- exclude: ["node_modules", "dist", "script"],
- coverage: {
- exclude: ["node_modules", "dist", "script", "packages/common/types.ts"],
- include: ["packages"],
- }
- },
- // ...
- })
🎊代码规范体系:ESLint + Prettier
ESLint 主要是代码质量的代码检查工具。它在 v8.53.0 版本后,移除了所有代码风格的检查,我们也不用过多考虑它和 Prettier 的冲突问题了。Prettier 专注于对代码风格进行处理。
参考这篇博客:ts 项目如何从 ESlint8 升级至 ESlint9 并集成 Prettier 的最新写法,Parsnip-Kit 项目使用了 ESLint + Prettier,并且让它们支持 TypeScript 的检查。
先安装这些依赖:
sh- npm i eslint eslint-config-prettier eslint-plugin-prettier typescript-eslint -D
在根目录新建 eslint.config.js,这是项目的配置:
js- import js from "@eslint/js"
- import globals from "globals"
- import tseslint from "typescript-eslint"
- import eslintConfigPrettier from "eslint-config-prettier"
- import eslintPluginPrettierRecommended from "eslint-plugin-prettier/recommended"
- export default tseslint.config({
- extends: [
- js.configs.recommended,
- ...tseslint.configs.recommended,
- eslintConfigPrettier,
- eslintPluginPrettierRecommended,
- ],
- files: ["**/*.{ts,js}"], // eslint 检测的文件,根据需要自行设置
- ignores: ["dist", "node_modules"],
- languageOptions: {
- ecmaVersion: 2020,
- globals: globals.browser,
- },
- rules: {
- "prettier/prettier": ["warn", {
- "semi": false,
- "singleQuote": true,
- 'trailingComma': 'none'
- }], // 默认为 error
- "arrow-body-style": "off",
- "prefer-arrow-callback": "off",
- "@typescript-eslint/no-explicit-any": "off", // allow any type
- "@typescript-eslint/no-unsafe-function-type": "off",
- "prefer-rest-params": "off",
- "@typescript-eslint/no-this-alias": "off",
- "@typescript-eslint/ban-ts-comment": "off"
- },
- })
然后就加入检测的命令到 package.json
json- {
- "scripts": {
- "lint": "npx eslint packages/",
- "lint:fix": "npx eslint packages/ --fix",
- }
- }
🔧Git 工作流:Husky
Husky 是一个可以在 git 钩子中执行代码的工具,我们可以在 git 钩子中,执行代码检查,保证提交代码的质量。
sh- npm install husky -D
- npx husky init
在项目根目录 .husky 文件夹中可以看到一个 pre-commit 文件,这里可以填入在提交之前执行的命令。
我们如果直接 npm run lint:fix 势必会涉及到未提交内容在内的所有文件。为了只检查已添加到 Git 中的文件,我们需要 lint-staged。
sh- npm install lint-staged -D
之后在 package.json 添加以下配置:
json- {
- "lint-staged": {
- "*.{js,ts}": [
- "eslint --fix",
- "git add"
- ]
- }
- }
这样子就可以在提交时对代码进行检查和修复了。
🎁脚手架:Inquirer
inquirer 是用于搭建命令行交互式问答的工具,利用它,我们可以通过简单的选项和输入,在项目中新增一个模块或者函数。举个简单的例子:
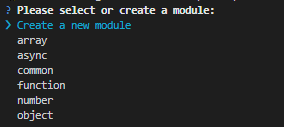

在用户输入完后,拿到回答再去新建相应的文件就好了。
下面就是这段对话的关键代码,详情请看这里:init.js。
js- const getSelectedModule = async () => {
- const modules = getPackageModules();
-
- const choices = modules.map(module => ({
- name: module,
- value: module
- }));
-
- choices.push({
- name: 'Create a new module',
- value: 'new'
- });
-
- const answers = await inquirer.prompt([{
- type: 'list',
- name: 'module',
- message: 'Please select or create a module:',
- choices: choices
- }]);
-
- if (answers.module === 'new') {
- const newModuleAnswer = await inquirer.prompt([{
- type: 'input',
- name: 'newModuleName',
- message: 'Please enter the name of the new module:',
- validate: input => {
- if (/^[a-zA-Z]+$/.test(input)) {
- return true;
- }
- return 'Module name must be in English';
- }
- }]);
-
- return newModuleAnswer.newModuleName;
- }
-
- return answers.module;
- };
📚文档生成:Comment-Parser
Parnip-Kit 的文档生成是借助 comment-parser 解析函数上的 JSDoc 注释,然后结合借助上文中脚手架生成的 markdown 模板文件完成的。
这个思路主要来自掘金上的这篇博客:开源一个可以将带有JSDoc注释的JS或TS文件转换为markdown的工具,作者把 JSDoc 转换为了 markdown 文档,极大简便了文档的维护。
但是这种方式也有不满足 Parsnip-Kit 场景的地方,我们的文档支持了多语言,如果按照这种方式,需要在注释中写一大堆多语言的东西,比较影响维护。后面参考了 Element-Plus 等组件文档的方法,函数的入参、返回以及简单的描述写在 JSDoc 注释中,在 markdown 模板中去嵌入它们。多语言和文档的更多详细描述转移到在 markdown 模板文件中完成。详见 generateMd.js。
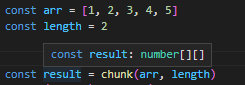
举个例子:
函数文件:
ts- /**
- * Splits array `arr` into sub-arrays with the length of `length`.
- * @template {} T Type of elements of array to split
- * @param {T[]} arr The array to split
- * @param {length} length The length of sub-arrays
- * @returns {T[][]}
- * @version 0.0.2
- */
- export function chunk<T>(arr: T[], length: number) {
- // ...
- }
中文的 markdown 模板:
md- # chunk
- [[[desc chunk
- 将数组 `arr` 分割成长度为 `length` 的子数组。
- ]]]
- [[[version chunk]]]
- ### Usage
- ```ts
- import { chunk } from 'parsnip-kit'
- const arr = [1, 2, 3, 4, 5]
- chunk(arr, 2)
- // [[1, 2], [3, 4], [5]]
- \`\`\`
- // 实际文件中 \`\`\` 没有 \ 符号,主要是因为不这样写在博客上 md 解析会出问题
- ### API
- #### Type Parameter
- [[[template chunk
- T: 要分割的数组的元素类型
- ]]]
- #### Arguments
- [[[params chunk
- arr: 要分割的数组
- length: 子数组的长度
- ]]]
- #### Returns
- [[[returns chunk]]]
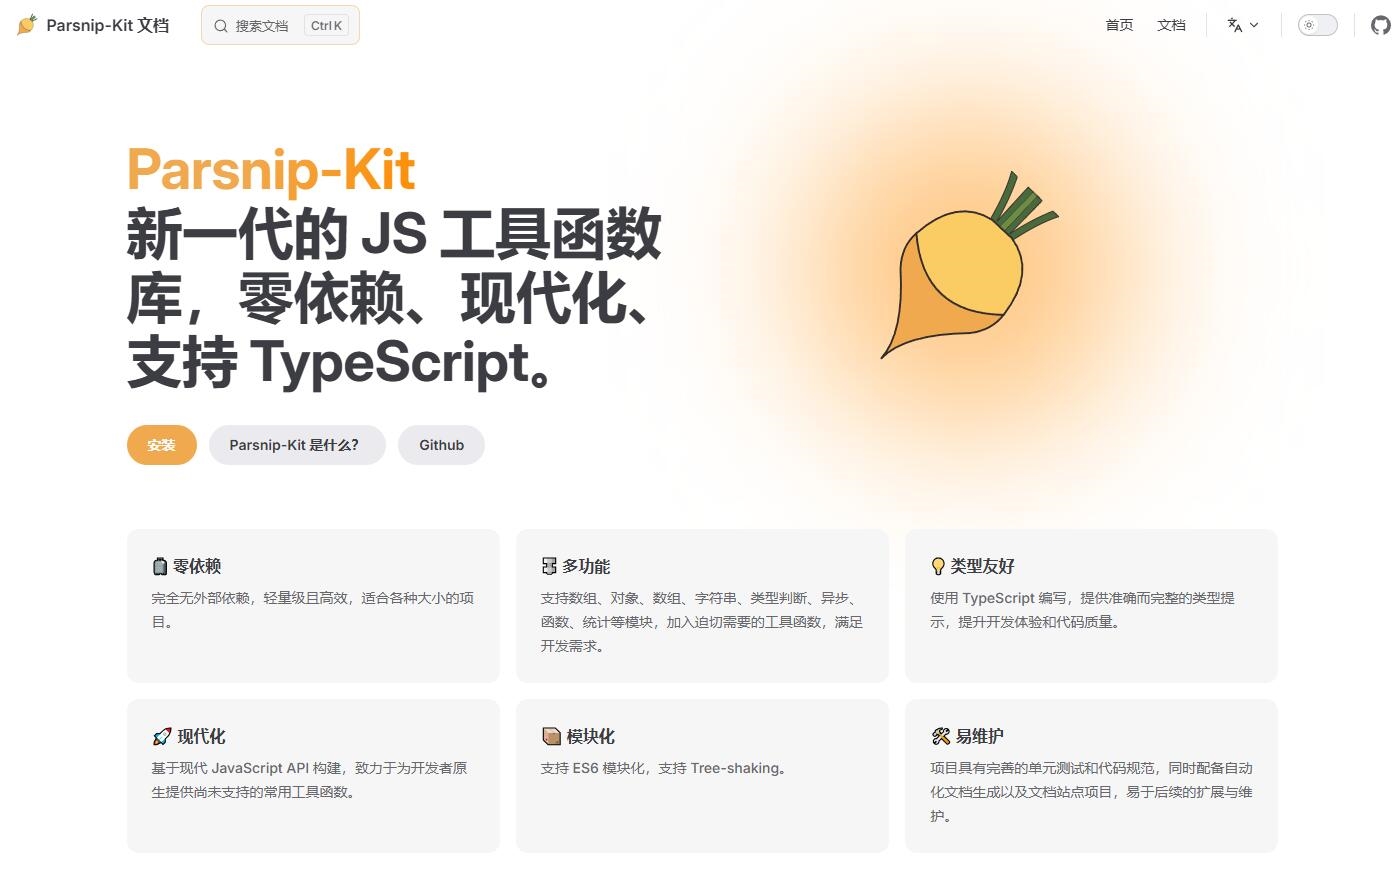
🎗文档站点:VitePress
VitePress 是 Vite 官方推出的一个静态站点生成器,特别适合用于构建技术文档站点。支持 Markdown 和 Vue 组件,允许我们在文档中嵌入交互式的示例和组件,增强文档的可读性和实用性。
这里内容比较多,下次再展开说,这是 Parsnip-Kit 的效果,站点:https://shika-space.github.io/parsnip-kit/
🧸结语
通过本文的完整技术方案,您也可以打造属于自己的工具库。
Parsnip-Kit 最早是为了减少自己开发中的模板代码而设计的,现在开源并且持续迭代,欢迎 Star ⭐ 和贡献代码!
Github:https://github.com/shika-space/parsnip-kit
文档站点:https://shika-space.github.io/parsnip-kit/